I made it through the first round! I was a little nervous there for a bit! Did you guess which was mine....

Yup, the butterfly shadow box. I have to admit, the folksy was really challenging for me. I love how it turned out, regardless of the fact I was towards the bottom.
And the butterflies inspired all the cute things I made for my front entry table and the wreath. I have been dying to post this for two weeks, but knew it would be a give away to which was my entry...so here is what I made to go with it....

The blocks...

introduce the papers. I may have admitted this before, but I am a paper hoarder. I love paper! It is really hard for me to cut it up...I mean, I know I can buy more, but what if I come up with something better that I could have used it on?
With that said, I love how all the papers combine, the perfect colors to kick off summer!
The topiary is a foam ball covered with "flowers", more on those in a minute...

some use buttons for the center, some use pearl beads and some have pins for the center. I used a branch from my tree as the pole. It took a lot of hot glue to stick it in place...actually this whole project took a lot of hot glue...
The birds nest

was my original idea for the folksy entry....but it just didn't feel folksy enough. The "nest" is burlap that was bathed in a mixture of mod podge and water

then molded around a plastic wrapped bowl


and left to harden and dry.
The birds are made with Muslim, that I hand dyed with Kool aid,

yup Kool Aid..with a just enough water to cover the fabric. I love how vibrant they turned out!
The wreath

started with a dollar store wreath. I hot glued flowers all around it, using the same types as I did from the topiary. I then used wire to make a few of the butterflies

float around the wreath....I sprinkled the butterflies throughout all of the projects.
The flowers used in all of the projects was an idea I found in Scrapbooks,etc.
If you look closely,
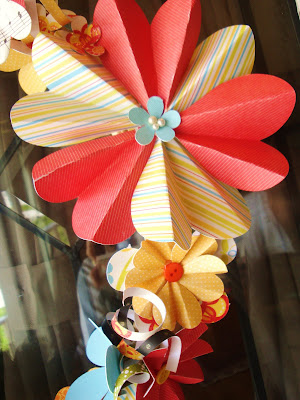
you can see that they are hearts, that are folded in half, then folded back in on itself and then opened up. Then they are hot glued onto a circle and finished with the different centers. I had so much fun trying different layers, and combinations to make all kinds of different flowers.
This week I have been working on "Bella" for my
Hug them All project.

And been quilting away with
Obsessively Stichings my first quilt...quilt along.

I am really excited about next weeks round on
SYTYC be sure to check it out on Monday when a new theme is introduced and all the new crafts are posted and if you can take a minute to vote.
I am linking this post to:


